Social Icons

Pages

Showing posts with label Linux. Show all posts

Install CentOS 5.9 with NetInstall method

1. Download CentOS 5.9 Net Install (NetInstall) Image

Select mirror here:
i386 version
x86_64 version
Select ISO image
CentOS-5.9-i386-netinstall.iso
CentOS-5.9-x86_64-netinstall.iso

2. Burn Image to CD and Boot Computer Using CentOS 5.9 Installation CD

Check CentOS image MD5 sum and burn image to CD with your favourite CD burner. And boot computer using CentOS Installation CD.

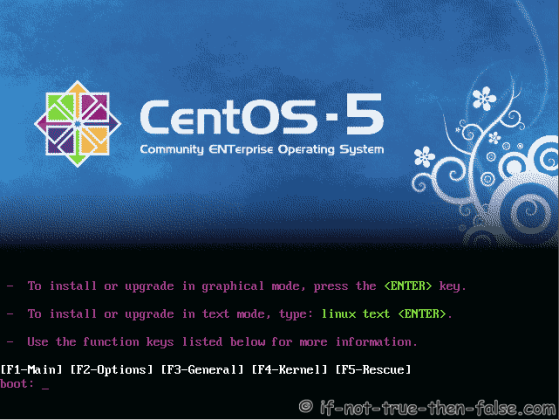
3. Select Network Installation (NetInstall) on LiveCD Grub Menu or just press enter on CentOS Netinstall CD

Centos 5.9 Netinstall boot

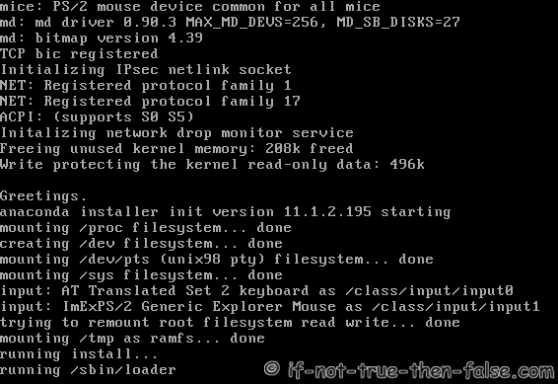
4. Booting CentOS 5.9 Installer

Booting CentOS 5.9 Installer

5. Choose a Language

Choose a Language

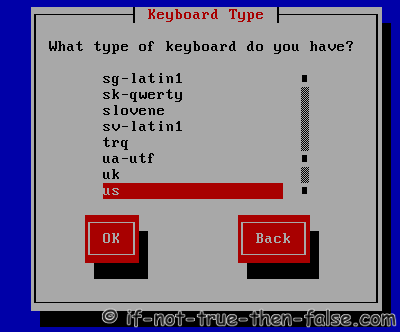
6. Select keyboard type

Select keyboard type

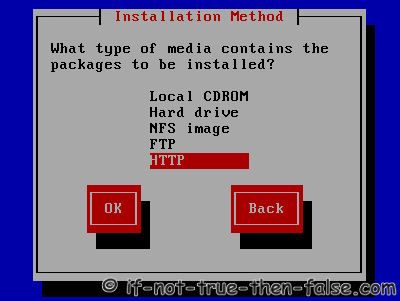
7. Select Network Installation Method

Select Network Installation Method

8. Configure TCP/IP settings

Configure TCP/IP settings

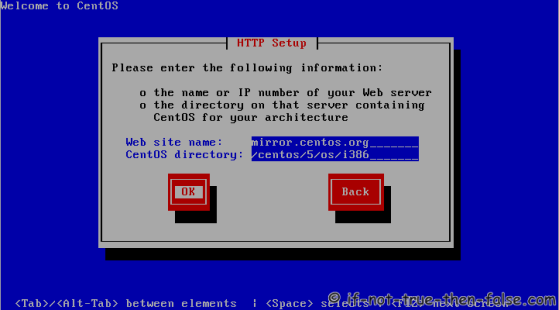
9. Setup CentOS 5.9 Netinstall URL (Installation Web site name and CentOS directory)

Web site name:
mirror.centos.org
CentOS directory for i386:
/centos/5/os/i386
or
/centos/5.9/os/i386
CentOS directory for x86_64:
/centos/5/os/x86_64
or
/centos/5.9/os/x86_64
CentOS 5 Netinstall url (http setup)

10. Downloading Installer

Downloading Installer

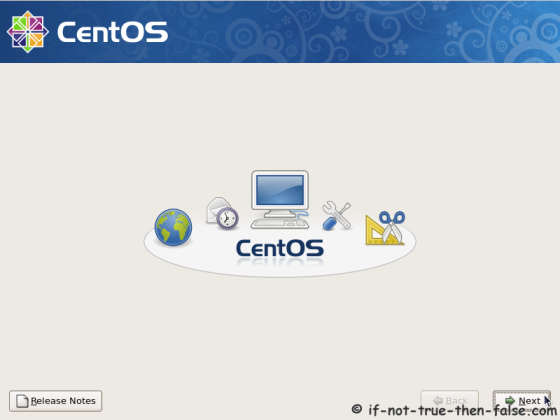
11. Welcome to CentOS Screen

CentOS 5.9 Welcome to CentOS

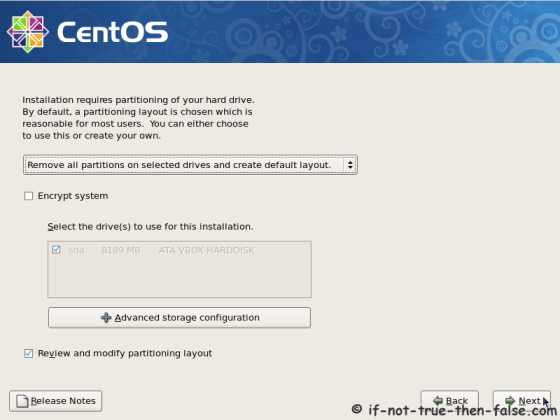
12. Select Partitioning Type

Select “Create custom layout” option if you want modify partitions.
CentOS 5.9 Select partitioning type
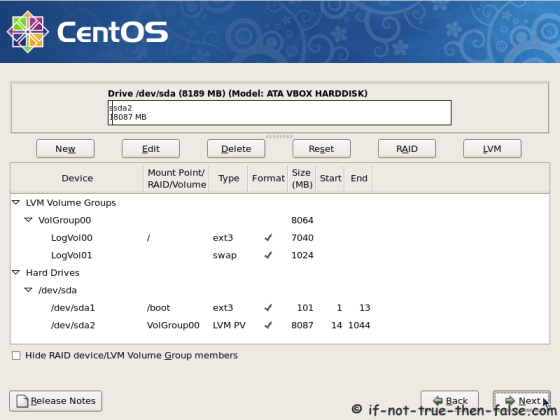
Here you can modify partition layout.
CentOS 5.9 Partition layout

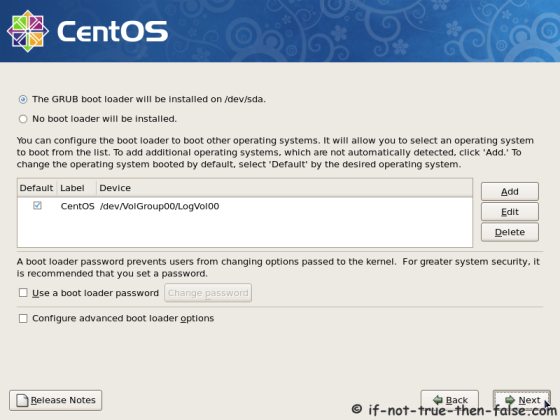
13. Boot Loader Configuration

CentOS 5.9 Bootloader setup

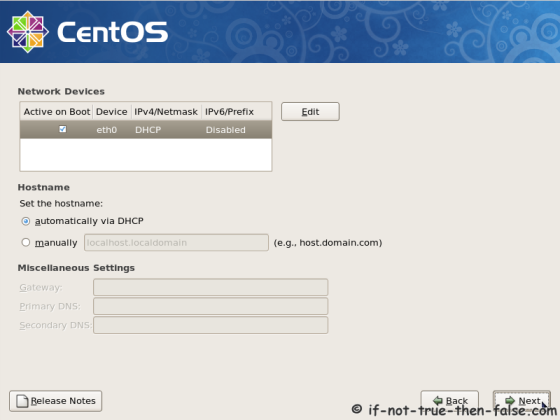
14. Network configuration

CentOS 5.9 Network setup

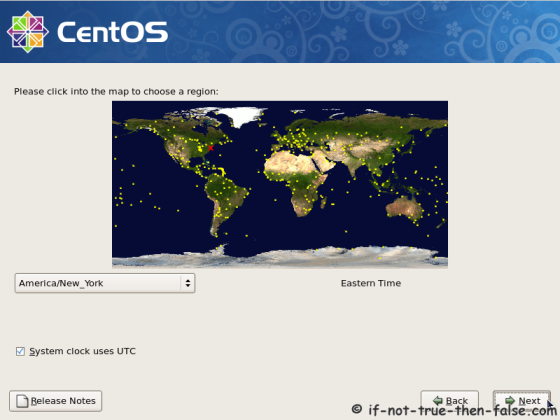
15. Select Time Zone

CentOS 5.9 Timezone setup

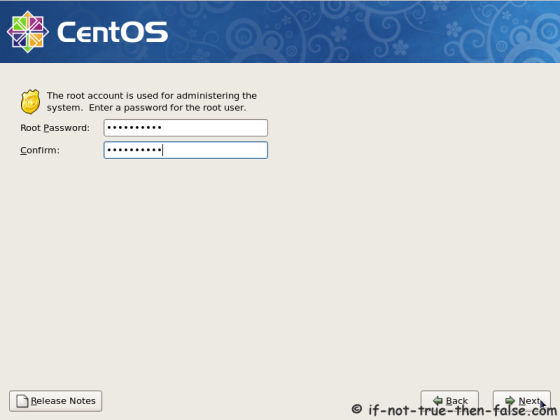
16. Set Root Password

CentOS 5.9 Set root password

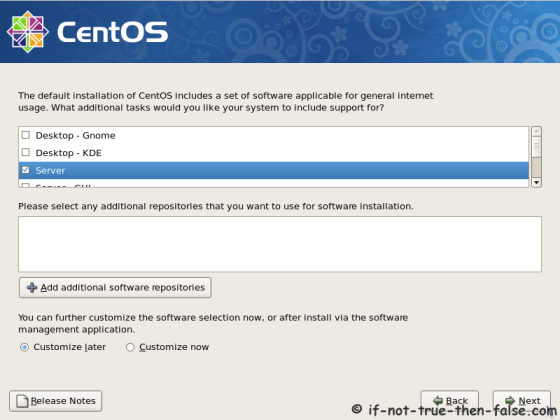
17. Select packages for Installation

CentOS 5.9 Select installation type

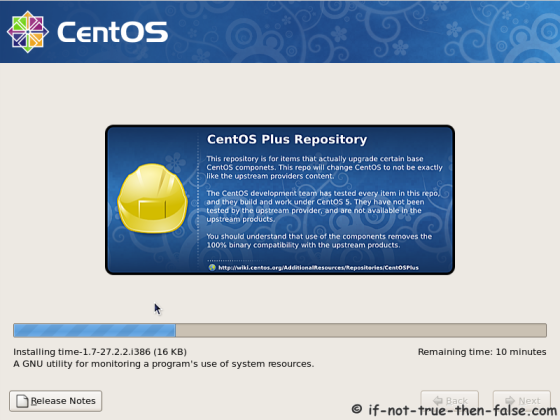
18. Installing Selected Packages

CentOS 5.9 Installing selected packages

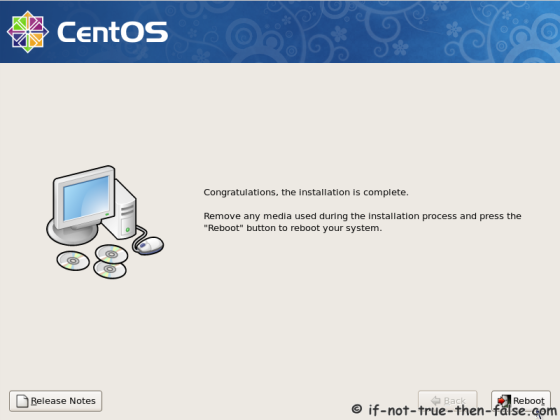
19. Installation Completed, Reboot

CentOS 5.9 Installation complete

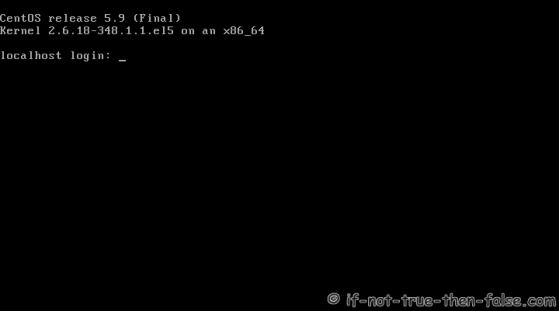
20. Booted on Just Installed CentOS 5.9 Linux Server Command Line

CentOS 5.9 Shell Login

Sumber : http://www.if-not-true-then-false.com/2010/centos-netinstall-network-installation/

PERINTAH PERINTAH DASAR LINUX CENTOS

Untuk menggunakan perintah linux, anda harus menggunakan fasilitas Terminal.
berikut cara untuk masuk ke terminal pada linux centos : klik kanan pada desktop, lalu Open Terminal
1. Organisasi user account
a. Su –l : perintah pindah ke user root
[ifan_13091531@localhost ~ ] $ su -l
pada masuk root , akan diminta password.
b. Adduser : perintah untuk membuat user account baru
Perintah : adduser namauser
[root @localhost ~ ] # adduser fauzan
c. Membuat password dari user account yang baru
Perintah : passwd namauser
d. SU : perintah untuk masuk ke root
Petintah : su namauser
[ifan_13091531@localhost ~ ] # su fauzan
[ifan_13091531@localhost root] $ cd (untuk masuk ke home user account yang telah anda buat)
[ifan_13091531@localhost ~ ] $
ORGANISASI FILE
a. cat : untuk membuat file baru
2.) cat>namafile : membuat file baru
[ifan_13091531@localhost latihan ] $ cat>latihan
latihan linux centos
simpan : ctrl + d
[ifan_13091531@localhost latihan ] $ 2.) cat namafile : membaca file yang sudah dibuat
[ifan_13091531@localhost latihan ] $ cat latihan
latihan belajar linux
3.) cat>>namafile : menambah isi file yang sudah dibuat
[ifan_13091531@localhost latihan ] $ cat>>latihan
belajar linux centos
siapa tahu jadi pintar
simpan : ctrl + d
[ifan_13091531@localhost latihan ] $
b. vi : membuat file baru dengan jendela editor
vi namafile
[ifan_13091531@localhost latihan ] $ vi latihan2
Masuk editor vi tekan Insert lalu isi file pada jendela editor
simpan file + keluar tekan >> : wq
keluar tapa menyimpan tekan >> : q!
menyimpan file tanpa keluar editor >> :w
REMOTE PC
REMOT PC keadaan dimana kita dapat masuk ke dalam file system computer yang dituju. Dan kita dapat mengendalikan/ngontrol computer tersebut. Selain kita dapat masuk ke computer tersebut kita juga dapat melakukan komuniklasi langsung satu sama lain seperti chating. Tetapi untuk melakukan ini semua kita harus dalam satu jaringan.
Berikut adalah perintah remote pc ke pc tujuan
*perintah : ssh IPAddress_tujuan
*perintah untuk chat : wall isipesan
*perintah untuk keluar dari remote pc : exit atau logout atau ctrl+D
MEMBUAT USER DAN GROUP MELALUI GUI
1. Pilih menu system->administrator->User and group.
2. Klik add user untuk menambahkan useraccount baru.
3. Masukan user name,full name dan password baru kemudian klik OK.
4. Buka terminal->aktifkan user yang dibuat dengan perintah “su namauser”.
MENGUBAH KEPEMILIKAN FILE/CHANGE OWNER DAN GROUP/CHANGE OUTPUT
Warning : perintah ini hanya dapat digunakan pada user “root”
Bentuk Umum :
#chown namauser.namagroup namafile
#chown namauser.namagroup namadirektori
CARA KOMPRES FILE DAN EXTRACT FILE
- Compres file : menjasikan file dengan kapasitas memory yang lebih ringan dari format biasa.
- Extract file : mengembalikan format file seperti semula.
=> Perintah untuk mengompres file
Bentuk umum : gzip nama_file
Contoh : [ifan_13091531@localhost~]$gzip lat_compress
=> Perintah untuk membaca file yang telah dikompres
Bentuk umum : zcat nama_file
Contoh : [ifan_13091531@localhost~]$zcat lat_compress
=> Perintah untuk mengekstract file
Bentuk umum : gunzip nama_file
Contoh : [ifan_13091531@localhost~]$gunzip lat_compress
[ifan_13091531@localhost~]$ls lat_compress
CARA KOMPRES FOLDER DAN EXTRACT FOLDER
Format ini dalah menyatukan banyak file menjadi satu file menjadi satu folder
gabungan dengan kapasitas memory yang lebih ringan. Format file: .tar
=> Perintah untuk mengompres folder
Bentuk umum : tar –cf folder.tar file1 file2 file3
[ifan_13091531@localhost~]$tar –cf latihan_zip.tar lat_compress latihan_owner
=> Perintah untuk mengekstract folder
Bentuk umum : tar –xf folder.tar
[ifan_13091531@localhost~]$tar –xf latihan_zip.tar
MEMBUAT FILE DENGAN TYPE SYIMBOLIC LINK/FILE SHORTCUT
Jika file masternya hilang maka file symbolicnya tidak akan bias dijalankan.
Jika ditampilkan warna dari jenis file ini : biru muda.
Bentuk umum : in –s nama_file nama_file_simbolic
CARA MEMBERI ALIAS/NAMA LAIN PADA PERINTAH LINUX
Bentuk umum : alias nama=perintah [ ifan_13091531 @localhost~]$alias lihat=ls
[ifan_13091531@localhost~]$lihat
CARA MEMBATALKAN ALIAS
Bentuk umum : unalias namagzip [ifan_13091531@localhost~]$unalias lihat
CARA MENGHITUNG BANYAKNYA BARIS ATAU CHARACTER DARI ISI FILE
Bentuk umum ke I : wc namafile
Bentuk umum ke II : wc –c namafile>>menhitung banyaknya karakter
Bentuk umum ke III : wc –l namafile>>menghitung bnyaknya baris
Bentuk umum ke IV : wc –w nama file>>menghitung banyaknya kata
 
Sumber : http://tutorial.fe.unpad.ac.id/?p=33

Cara Install Kloxo Panel Di Server Centos

 Kloxo Panel adalah free control panel yang  Paling powerfull Untuk Versi Free isinya hampir sama dengan Cpanel, bahkan banyak orang yang mengatakan ini adalah kloningan dari cpanel

Install kloxo sangat mudah sekali dan control panel hosting ini adalah free control panel yang saya anggap paling powerfull/ yang paling lengkap dari pada yang lain.


Yang harus disiapkan adalah:
  1. Sebuah dedicated server atau virtual berjalan CentOS atau Red Hat EL 5.x. CentOS 6.x saat ini tidak didukung.
  2. Paling sedikit 256 MB RAM (cukup untuk menjalankan Yum).
  3. Paling sedikit 2 GB ruang disk untuk layanan Kloxo dan terkait.
  4. Jika Anda dipartisi disk Anda secara manual, pastikan Anda memiliki tmp / besar. Kloxo menggunakan / tmp untuk membuat dan menyimpan backup sementara dan proses akan gagal jika tidak ada ruang yang cukup.


Mulai install

Anda harus menonaktifkan SELinux dengan mengedit /etc/sysconfig/selinux dan mengubah baris selinux=disabled. Ini akan menjaga SELinux dari yang diaktifkan pada server boot berikutnya.

Kemudian Anda harus menjalankan perintah berikut sebagai root untuk menonaktifkan SELinux untuk sesi saat ini:


# su - root # setenforce 0


Jika Anda tidak memiliki server MySQL sudah terinstal, Anda harus menjalankan:

# su - root # yum install -y wget # wget http://download.lxcenter.org/download/kloxo/production/kloxo-installer.sh
install as Master (Default Single Server):# sh ./kloxo-installer.sh --type=master

Nanti ada beberapa perintah, jika ada pertanyaan jawab saja Y ayau Yes agar instalasi berjalan dengan semestinya.
Setelah Kloxo terinstal, Anda dapat terhubung ke http://YOUR_SERVER_IP:7778 dan Anda akan disajikan dengan layar login. Login sebagai admin dengan password admin dan sekali Anda berada, Kloxo akan meminta Anda untuk mengganti password default ke yang aman.


Satu lagi yang jangan sampai terlupa untuk setting ifcfg-eth0, karena akan berpengaruh pada muncul atau tidaknya website anda.

masuk ke


cd /etc/sysconfig/network-scripts

edit file ifcfg-eth0
vi ifcfg-eth0

edit seperti ini. tentunya sesuai dengan IP, netmask. getaway anda.

DEVICE=eth0
BOOTPROTO=none
ONBOOT=yes
IPADDR=12.34.56.78 #YOUR IP
NETMASK=255.255.255.0 #DEFAULT INFO, do not change.
GATEWAY=12.34.56.1 #follow your main ip
Selesai...


Versi Demo Kloxo panel Silahkan Lihat Di  : http://demo.kloxo.com:7778/login/

Kelebihan dan Fitur Kloxo panel


Features:

1. CentOS 5 Support
2. Integrates with billing software such as AWBS, WHMCS and HostBill
3. Kloxo HostinABox: Feature Complete web hosting platform that uses 10MB RSS.
4. Kloxo Enterprise: distributed hosting platform.
5. View, Search and Manage your entire hosting, and every domain from a single page.
6. Lxguard, advanced intrusion detection management interface.
7. Supports apache/lighttpd, djbdns/bind and pure-ftpd
8. On the fly Switch between applications
9. Scale to million hits per day, using fastcgi
10. Advanced Backup/Restore
11. Upgrade from HostInABox to Enterprise without re-installing
12. Parked/Redirected Domains
13. Integrated RoR

Main Features:

1. Full Distribution of resources across machines.
2. Ability to move accounts from one cluster to another.
3. Backup your entire hosting and restore ANY part of it.
4. Disk usage and warning report for the whole cluster.
5. Ability to move resources across machines on-the-fly. Start with a single server, and when you have reached the saturation, just add another server and move the requisite resources to the new machine.
6. Move Clients/Domains across resellers. You can change the ownership of both clients and domains and move them around trivially.

General Features:

1. Messaging System. Kloxo allows you have a better relationship with your customers using our messaging and ticketing system.
2. Ticket System. This is a full featured trouble ticket system that allows customers to post their complaints without the need to login to their main account.
3. Ticket alerts.
4. Disable / Enable Resellers.
5. Change Reseller’s quotas.
6. Command Line api to everything that can be done through web interface.

Client functions:

1. Manage reseller quotas: Control your client’s ability to:
2. Change Banner
3. Enable frontpage
4. Enable ssl
5. Web server pool
6. Mail server pool
7. Dns Server pool
8. Database server pool.
9. Ipaddress pool.
10. Exclusive ipaddress: Allow a customer to setup ssl certificate for this ipaddress.

Backup

1. Backup Your Entire Account, including domains, clients, databases, directory protects, and also the contents of all the resources.
2. Schedule backup.
3. Upload backup to Ftp servers.

Mail Functions

1. Catchall
2. Manage email accounts
3. Webmail
4. Auto-responders
5. Forwarding
6. Mailing list Management (ezmlm)
7. Full control of Dns.
8. Spam filtering (SpamAssassin)

Stats

1. AWStats
2. View latest visitors
3. View bandwidth usage
4. Traffic Calculation includes Mail, Web and Ftp Traffics.
5. View error log
6. Download raw log file

Web functions

1. Directory Protect
2. User password directly linked to the Frontpage password.
3. Frontpage Install/Uninstall
4. Custom error pages
5. Redirects
6. Cluster aware File Manager
7. Cron job management.
8. Manage FTP accounts

Subdomains

1. Ability to add/remove subdomains
2. Ability to create Ftp users for specific subdomains.

Database Management

1. Manage MySQL databases on multiple servers
2. Intelligent phpMyAdmin access. Kloxo will automatically redirect you to the correct server on which the database is configured.

Server Functions:

1. Manage Services
2. Change Database adminstrator password
3. Ipaddress management
4. See all the domains that are using the particular server.
5. Cron jobs.
6. Log manager
7. Process Manager
8. Package updation. Using up2date.

Platform Support
CentOS 5 Stable (32Bit)

RHEL 5: Stable (32Bit)

Sumber : http://www.rapani-id.com/tutorial/cara-install-kloxo-panel-di-server-centos